UPDATE: Owncloud v6.0.3 on Ubuntu 14.04 posted here.
Thought I would try out installing OwnCloud on Ubuntu Server 12.10 and after searching couldn't find exactly the install that would work.
So here goes on what I've been able to find out and what's working for me. Please feel free to add in the comments better security features as I'm definitely not a linux security guy.
1. Install Ubuntu Server with OpenSSH and LAMP.
2. Update the OS. Change over to admin privleges. It's just easier with all the commands. If you chose not to just add sudo before each command that follows.
sudo su
apt-get update
apt-get upgrade
3. I found with some installs there were more programs added but the default 12.10 install wouldn't recognize them so i removed them and things appear to be running fine.
apt-get install php5 php5-common php5-gd php5-sqlite curl php5-curl
4. Download OwnCloud. At the time of this writing the current version was 4.5.2 so substitute for the latest.
wget http://mirrors.owncloud.org/releases/owncloud-4.5.2.tar.bz2
5. Extract OwnCloud.
tar xvf owncloud-4.5.2.tar.bz2
6. Move OwnCloud to the /var/www directory.
mv owncloud/ /var/www/
7. Set permission on the owncloud directory to work with apache2.
chown -R www-data:www-data /var/www/owncloud
8. Log into your OwnCloud.
http://<ip>/owncloud
9. Set your admin login and password.
10. The data directory should have been created now.
11. Move the data directory out of the /var/www/owncloud/data file structure.
mv /var/www/owncloud/data /
12. Edit the /var/www/owncloud/config/config.php to point to the current location of the data directory.
nano /var/www/owncloud/config/config.php
'datadirectory' => '/data',
13. Didn't like the default cloud upload size of 2M or php's default...which ever.
nano /etc/php5/apache2/php.ini
post_max_size = 4G
cgi.fix_pathinfo = 0
upload_max_filesize = 4G
date.timezone = "America/New_York"
14. To make should that apache2 will allow changes during the uploads I think modify the defaults.
nano /etc/apache2/sites-available/default
DocumentRoot /var/www
<Directory />
Options FollowSymLinks
AllowOverride All
nano /etc/apache2/sites-available/default-ssl
DocumentRoot /var/www
<Directory />
Options FollowSymLinks
AllowOverride All
15. Now to get https ssl working with OwnCloud I created self-signed certs. End a self signed password that you will remember as it will ask you again.
openssl genrsa -des3 -out /etc/ssl/server.key 4096
openssl req -new -key /etc/ssl/server.key -out /etc/ssl/server.csr
openssl x509 -req -days 3650 -in /etc/ssl/server.csr -signkey /etc/ssl/server.key -out /etc/ssl/server.crt
openssl rsa -in /etc/ssl/server.key -out /etc/ssl/server.key.insecure
mv /etc/ssl/server.key /etc/ssl/server.key.secure
mv /etc/ssl/server.key.insecure /etc/ssl/server.key
mkdir /etc/apache2/ssl
cp /etc/ssl/server.key /etc/apache2/ssl
cp /etc/ssl/server.crt /etc/apache2/ssl
16. Start https port 443
a2enmod ssl
17. Activate the service.
ln -s /etc/apache2/sites-available/default-ssl /etc/apache2/sites-enabled/000-default-ssl
18. This prevents apache2 from complaining.
echo "ServerName localhost" >> /etc/apache2/apache2.conf
19. Restart apache2.
/etc/init.d/apache2 restart
20. You should be able to login to https://<IP>/owncloud now.
21. If you want remote clients to be able to connect you will have to properly link the ssl certs within apache2. Comment # out the existing and add the ones we created above.
nano /etc/apache2/sites-available/default-ssl
# SSL Engine Switch:
# Enable/Disable SSL for this virtual host.
SSLEngine on
# A self-signed (snakeoil) certificate can be created by installing
# the ssl-cert package. See
# /usr/share/doc/apache2.2-common/README.Debian.gz for more info.
# If both key and certificate are stored in the same file, only the
# SSLCertificateFile directive is needed.
SSLCertificateFile /etc/apache2/ssl/server.crt
SSLCertificateKeyFile /etc/apache2/ssl/server.key
# SSLCertificateFile /etc/ssl/certs/ssl-cert-snakeoil.pem
# SSLCertificateKeyFile /etc/ssl/private/ssl-cert-snakeoil.key
22. Also add the following to the top of the file /etc/apache2/sites-available/default-ssl. Change <your dynmanic server name> to your OwnCloud domain name.
<IfModule mod_ssl.c>
<VirtualHost _default_:443>
ServerAdmin webmaster@localhost
ServerName <your dynamic server name>
DocumentRoot /var/www
UPDATE 5 Feb 2013
UPDATING YOUR INSTALLATION
Use sudo on commands or switch to root via sudo su
1. Check your version by going to your owncloud via the web interface. Login via your admin account. Select settings (bottom left pane). Select Admin. Scroll to see the version in the right pane at the bottom. When updating make sure you stay with that version 4.0.3 --> 4.0.6 or 4.5.2 --> 4.5.6. Get it? If you are upgrading to an entirely new version see that documentation.
2. This is assuming you are located under your root user directory. /home/<username>
3. Download the must recent version.
4. sudo wget http://mirrors.owncloud.org/releases/owncloud-4.5.6.tar.bz2
5. Unpack
6. sudo tar -xjvf owncloud-4.5.6.tar.bz2
7. Backup your owncloud directory in case something goes wrong.
8. sudo rsync -a /var/www/owncloud/ owncloud_bkp`date +"%Y%m%d"`/
9. Backup your data directory in case something goes wrong.
10. sudo rsync -a /data/ owncloud_data_bkp`date +"%Y%m%d"`/
11. Save a copy of your config file. Mark the file with the old version number.
12. sudo cp /var/www/owncloud/config/config.php /var/www/owncloud/config/config-4.5.2.php
13. Sync the new version files with your old.
14. sudo rsync --inplace -rtv owncloud /var/www/
15. Clean up the new version.
16. sudo rm -rf owncloud
17. Should be able to restart your server and check the version again to ensure the update took.
Sunday, November 18, 2012
Tuesday, November 6, 2012
Maximize CPU Usage
Jun 2012
Unpark your cores…
Ever notice that some of your cores aren’t being used. (i.e. parked)

Here are the steps to unpark and make use of them all the time.
Out of the box the operating systems might not
fully enable the distribution of processes over the cores for certain
system configurations. To fix this and enable all cores:
1. Open Regedit. Start –> in run type regedit –> enter
2. Highlight Computer in left pane.
3. Select Edit from the menu –> Find –> Paste the following to search: 0cc5b647-c1df-4637-891a-dec35c318583
4. Select Find next.
5. Make sure ValueMin and ValueMax are set to 0. If already 0 then leave alone. If not double click on ValueMin/ValueMax and type 0 and save.
change to
6. F3 to find the next one, there should be around two or three.
7. Once finished search will advise it has gone through the entire registry.
8. Shut down and restart.
9. All cores should be in use now.
Creating a Home Email Server
Dec 2012
Pictures got bumped from the blog move. Sorry.
Mar 2012
You might want to have your own email server because your paranoid, can’t stand the fact that free web email posts ads based on the contents of your email, or curiosity. For what ever your reasons this is how I made mine.
Things you’ll need prior.
Within your domain host you should locate where you can make edits to the DNS.
After locating this area we need to add a subdomain.
The subdomain should be mail.example.com. Obviously select your domain name.
Edit the mail.example.com subdomain DNS.
Make the DNS A record point to the static IP of you email server. Make the MX (mail exchange) record point to mail.example.com with a value of 10.
This could take some time to populate throughout their servers.
INSTALL UBUNTU SERVER
For the most part the install of Ubuntu Server was default and selecting the packages differed. I only installed OpenSSH and LAMP.
If you install the mail server it uses dovecot and I perfer courier.
After installing ubuntu server I then installed ubuntu-dekstop:
Its much easier to install the configuration files and follow along in the GUI.
After installing the ubuntu-desktop reboot and follow this walk through: http://www.pixelinx.com/2010/10/creating-a-mail-server-on-ubuntu-using-postfix-courier-ssltls-spamassassin-clamav-and-amavis
***TYPO*** When you get to 15-content-filter-mode its actually 15-content_filter_mode
After your completed there are some additional changes and additions to be made.
I added to the following lines to /etc/postfix/main.cf.
Locate the relayhost. The reason for this is to use an existing email account on your domain to send email out.
Locate the #Encrypted authentication (SASL) and add the following:
Save /etc/postfix/main.cf
We need to add the relayhost login and password so that we can send mail through a SMTP server. The reason for using a host is that often home email servers get placed on an email blacklist and your email are lost. Its the host problem to ensure there email server dont end up on those lists. Change to your domain and port. The email address is normally used to authenticate through the relay. This email address and password can be set up through your domain.
After this I added an additional user to the mysql database mail.
Login to MySQL.
Send this USER email from another source. This will populate the folders required to login.
INSTALL SQUIRRELMAIL
SETUP APACHE
SETUP SSL FOR APACHE (http://www.tc.umn.edu/~brams006/selfsign.html) and (http://www.tc.umn.edu/~brams006/selfsign_ubuntu.html)
EDIT HOSTS
SQUIRRELMAIL
modify;
to;
EDIT SQUIRRELMAIL
Locate secure_login and enter the number to enable.
APACHE EDITS (https://help.ubuntu.com/community/EnablingUseOfApacheHtaccessFiles)
Find;
Modify;
Same for:
ADD:
Try logging into your email server:
http://mail.example.com
You should see the cert error and must accept the cert.
After that you should be able to login.
Might be able to add some additional configuration from here. http://flurdy.com/docs/postfix/
UPDATE 120319;
Recenting added the change_sqlpass plugin and that took and little figuring out. The screen will go blank and forces you to re-login with new password.
The config.php should have the following settings:
Pictures got bumped from the blog move. Sorry.
Mar 2012
You might want to have your own email server because your paranoid, can’t stand the fact that free web email posts ads based on the contents of your email, or curiosity. For what ever your reasons this is how I made mine.
Things you’ll need prior.
- Purchase a domain of your choosing
- Static home IP
- Install Ubuntu 11.10 Server
Within your domain host you should locate where you can make edits to the DNS.
After locating this area we need to add a subdomain.
The subdomain should be mail.example.com. Obviously select your domain name.
Edit the mail.example.com subdomain DNS.
Make the DNS A record point to the static IP of you email server. Make the MX (mail exchange) record point to mail.example.com with a value of 10.
This could take some time to populate throughout their servers.
INSTALL UBUNTU SERVER
For the most part the install of Ubuntu Server was default and selecting the packages differed. I only installed OpenSSH and LAMP.
If you install the mail server it uses dovecot and I perfer courier.
After installing ubuntu server I then installed ubuntu-dekstop:
sudo apt-get install -y ubuntu-desktop
Its much easier to install the configuration files and follow along in the GUI.
After installing the ubuntu-desktop reboot and follow this walk through: http://www.pixelinx.com/2010/10/creating-a-mail-server-on-ubuntu-using-postfix-courier-ssltls-spamassassin-clamav-and-amavis
***TYPO*** When you get to 15-content-filter-mode its actually 15-content_filter_mode
After your completed there are some additional changes and additions to be made.
I added to the following lines to /etc/postfix/main.cf.
Locate the relayhost. The reason for this is to use an existing email account on your domain to send email out.
relayhost = [smtp.1and1.com]:587
Locate the #Encrypted authentication (SASL) and add the following:
smtp_sasl_auth_enable = yes
smtp_sasl_password_maps = hash:/etc/postfix/sasl_passwd
smtp_sasl_security_options = noanonymous
smtp_sasl_tls_security_options = noanonymous
Save /etc/postfix/main.cf
We need to add the relayhost login and password so that we can send mail through a SMTP server. The reason for using a host is that often home email servers get placed on an email blacklist and your email are lost. Its the host problem to ensure there email server dont end up on those lists. Change to your domain and port. The email address is normally used to authenticate through the relay. This email address and password can be set up through your domain.
echo [smtp.1and1.com]:587 mail@example.com:password” > /etc/postfix/sasl_passwdpostmap /etc/postfix/sasl_passwdAfter this I added an additional user to the mysql database mail.
Login to MySQL.
mysql -u root -pUSE mail;INSERT INTO `user` (`email`, `password`, `name`, `quota`, `enabled`) VALUES ('USER@example.com‘, ENCRYPT(’changeme‘), ‘Administrator‘, NULL, 1);exit;Send this USER email from another source. This will populate the folders required to login.
INSTALL SQUIRRELMAIL
apt-get install -y squirrelmail squirrelmail-locales php-pear php5-cliSETUP APACHE
cp /etc/squirrelmail/apache.conf /etc/apache2/sites-available/squirrelmailln -s /etc/apache2/sites-available/squirrelmail /etc/apache2/sites-enabled/500-squirrelmaila2ensite squirrelmailapache2ctl -t/etc/init.d/amavis startSETUP SSL FOR APACHE (http://www.tc.umn.edu/~brams006/selfsign.html) and (http://www.tc.umn.edu/~brams006/selfsign_ubuntu.html)
openssl genrsa -des3 -out /etc/ssl/server.key 4096openssl req -new -key /etc/ssl/server.key -out /etc/ssl/server.csropenssl x509 -req -days 3650 -in /etc/ssl/server.csr -signkey /etc/ssl/server.key -out /etc/ssl/server.crtopenssl rsa -in /etc/ssl/server.key -out /etc/ssl/server.key.insecuremv /etc/ssl/server.key /etc/ssl/server.key.securemv /etc/ssl/server.key.insecure /etc/ssl/server.keymkdir /etc/apache2/sslcp /etc/ssl/server.key /etc/apache2/sslcp /etc/ssl/server.crt /etc/apache2/ssla2enmod sslln -s /etc/apache2/sites-available/default-ssl /etc/apache2/sites-enabled/000-default-sslecho "ServerName localhost" >> /etc/apache2/apache2.conf/etc/init.d/apache2 restartEDIT HOSTS
nano /etc/host127.0.0.1 localhost localhost.localdomain mail
127.0.1.1 mail
173.72.XXX.XXX mail.example.comSQUIRRELMAIL
cd /usr/share/squirrelmail/plugins/wget "http://www.squirrelmail.org/plugins/secure_login-1.4-1.2.8.tar.gz"tar xzvf secure_login-1.4-1.2.8.tar.gzcd secure_login/cp config.sample.php config.phpnano config.phpmodify;
$change_back_to_http_after_login = 1;to;
$change_back_to_http_after_login = 0;EDIT SQUIRRELMAIL
squirrelmail-configureDcourier8Locate secure_login and enter the number to enable.
SQAPACHE EDITS (https://help.ubuntu.com/community/EnablingUseOfApacheHtaccessFiles)
nano /vetc/apache2/sites-available/defaultFind;
<Directory /var/www/> Options Indexes FollowSymLinks MultiViews AllowOverride NoneModify;
AllowOverride AllSame for:
nano /vetc/apache2/sites-available/default-sslcd /var/wwwnano .htaccessADD:
# This allows you to redirect index.html to a specific subfolderRedirect /index.html https://mail.example.com/squirrelmail/Try logging into your email server:
http://mail.example.com
You should see the cert error and must accept the cert.
After that you should be able to login.
Might be able to add some additional configuration from here. http://flurdy.com/docs/postfix/
UPDATE 120319;
Recenting added the change_sqlpass plugin and that took and little figuring out. The screen will go blank and forces you to re-login with new password.
The config.php should have the following settings:
$csp_dsn = 'mysql://root:password@localhost/mail’;

$lookup_password_query = ‘SELECT count(*) FROM user WHERE email = “%1″ AND password = %4′;

$password_update_queries = array(’UPDATE user SET password = %4 WHERE email = “%1″‘);

$force_change_password_check_query = ”;

$password_encryption = ‘MYSQLENCRYPT’;

$csp_salt_static = ‘LEFT(password, 2)’;

$csp_secure_port = 0;

$csp_non_standard_http_port = 0;

$min_password_length = 8;

$max_password_length = 0;

$include_digit_in_password = 1;

$include_uppercase_letter_in_password = 1;

$include_lowercase_letter_in_password = 1;

$include_nonalphanumeric_in_password = 0;

$csp_delimiter = ‘@’;

$csp_debug = 0;
Creating WinFE Boot Disc
Dec 2011
Updated 4 Jan 2012
Updated Nov 2014
Creating a forensic bootable environment to run tools on a target system using WinPE.
1. Download Windows AIK iso. This file will aid in providing necessary files to create the winFE.
2. Mount Windows AIK file KB3AIK_EN.iso.

 3. Open the contents, locate StartCD.exe and execute.

4. Install Windows AIK Setup.

5. Default installation path.
6. Open Administrator command prompt. Right click command prompt and run as administrator.

7. Change directory in the PRTools area.
cd "c:\Program Files\Windows AIK\Tools\PETools"

8. Copy the necessary files to your winFE creation area.
copype x86 c:\winFE

9. Mount the bootable area.
Dism /Mount-Wim /WimFile:c:\winFE\winpe.wim /index:1 /MountDir:c:\winFE\mount

10. Should see the mount area is populated.

11. Time to mod the registry so that the disc will not automount onboard drives. Open regedit. Start –> regedit.exe –> <enter>.

12. Highlight HKLM

13. Select File –> Load Hive …

14. Locate c:\winFE\mount\Windows\System32\config\system –> Open

15. Name it “winFE”

16. Under HKLM should be winFE

17. Locate the following key HKLM\winFE\ControlSet001\Services\mountmgr –> Right click right panel and select New –> DWORD.

18. Name it NoAutoMount = 1

19. Modify HKLM\winFE\ControlSet001\Services\partmgr\parameters\sanpolicy = 3
***Some other people have also been using # 4 ***

***Additional item to change as OPTIONS ***
HKLM\winFE\ControlSet001\Control\FileSystem /v DisableDeleteNotification /t REG_DWORD /d 1 /f
20. Highlight winFE

21. Select File –> Unload Hive… Confirm Close

22. Modify the wallpaper if you like. Name the BMP winpe.bmp and overwrite existing under c:\winFE\mount\Windows\System32
23. Add directory tools under c:\winFE\mount\

24. Drop tools like RegRipper, Cygwin, FTK Imager Lite, NetCat, Winrar unplugged, IrfanView, etc in this location.
Update 31 Dec 2012; I had to change from long file name to short for some reason even though I had the correct path. You might be able to use long file names with quotes starting at the "c:\...winpe-wmi.cab". Short is what worked for me and I can only guess that it was something to do with the dism.exe program.
25. Add VBS scripting capability:
dism.exe /image:c:\winFE\mount /add-package /packagepath:C:\Progra~1\WI4A4E~1\Tools\PETools\x86\WinPE_FPs\winpe-wmi.cab

26. (Hint use the arrow up key in the keyboard and change wmi to hta) Add HTA:
dism.exe /image:c:\winFE\mount /add-package /packagepath:C:\Progra~1\WI4A4E~1\Tools\PETools\x86\WinPE_FPs\winpe-hta.cab

27. Add scripting:
dism.exe /image:c:\winFE\mount /add-package /packagepath:C:\Progra~1\WI4A4E~1\Tools\PETools\x86\WinPE_FPs\winpe-scripting.cab

28. Add .vbs scripts (props: http://praetorianprefect.com/archives/2010/04/winpe-3-0-forensics/) under tools.
***Additional item to modify would be to set the scratch space ***
Dism.exe /image:c:\winfe\mount /Set-ScratchSpace:512
This would mean the system your booting requires at least 1GB RAM. You could modify to 256 and so on but 512 is the max. Most new systems these days have over 1GB RAM.
29. Add driver packs that way what ever system you come across should boot and see the onboard drives without issue. I have had issues in the past with Linux bootCDs that would not recognize hardware raids specifically SAS Dell blade servers. This winFE was able to see the hardware raid and image them without issue using the existing hardware. I extracted them to my c:\ drive root.
dism.exe /image:c:\winFE\mount /add-driver /driver:c:\DP_MassStorage_wnt6-x86_1110 /recurse

30. I ran the following driver packs. The only reason you would need the LAN or WLAN is if you planned on using NetCat to maybe transfer and image file over the network. CardReader for high capacity drives to store images maybe. Chipset and MassStorage are the two most important. Download the latest and greatest.
32. Make sure your not in the command prompt c:\winFE area when you issue the command.
cd c:\
dism /unmount-wim /mountdir:c:\winFE\mount /commit
33. Should get a successful completion.
34. Copy file
copy c:\winfe\winpe.wim c:\winfe\iso\sources\boot.wim /Y
35. Remove bootfix.bin so that you are not prompted to hit any key to boot from disc. This would be bad if we forgot and booted the operating system.
del /f /q c:\winFE\ISO\boot\bootfix.bin
36. Create ISO
cd "c:\Program Files\Windows AIK\Tools\x86"
oscdimg -n -bc:\winFE\etfsboot.com c:\winFE\ISO c:\winFE\winFE.iso
37. Should have your .iso file.
38. Dont forget to test it out…through vmware or live test system before using it within production.
39. To add additional tools, drivers, scripts etc start at step 9 and follow until creating the .iso.
Continuation from the Creating WinFE Boot Disc
***WHILE TESTING ENSURE BIOS IS SET TO BOOT CD/DVD***
***ON REAL TARGETED SYSTEMS IT IS A GOOD PRACTICE TO DISCONNECT THE HARD DRIVE BEFORE CHANGING THE BIOS***
1. Edit the existing image.
Dism /Mount-Wim /WimFile:c:\winFE\winpe.wim /index:1 /MountDir:c:\winFE\mount
***SPECIAL NOTE***
If you ever get this message because you failed to properly exit out of a mounted area of c:\winFE utilize the following command:

dism /cleanup-wim
2. Should be able to see the mounted image under c:\winFE\mount
3. I would recommend creating a text document that runs through the diskpart commands if you plan on using diskpart to enable your storage device read/write capability.
4. Lets get the menu system up and running. Download PStart.
5. ***Optional*** I had a spare 4GB USB drive lying around and decided to use that and install PStart to. Reasoning was my attempt at keeping things in order. No other purpose other than that.
6. The winFE disc when booted will be “X:\” so we will have to make sure when we install the programs we give it the right drive letter to run from.
7. ***Optional*** I installed PStart to my 4GB USB drive. If you have an SD drive that is fine too or use your OS c:\. Additionally if you don’t have any issues with permissions you could just install right to c:\winFE\mount\ -or- c:\winFE\mount\t0olz
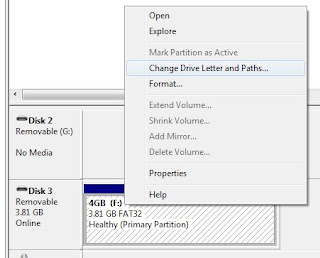
8.***Optional*** I decided to change the drive letter of my 4GB USB drive to “x:\” just like the winFE disk. This can be done under computer management.
9. Lets download Notepad++ portable and install to get it working in our winFE and PStart.
10. Install notepad++ and copy the contents to the winFE tools area

11. Start PStart by executing the .exe file. The window will appear but of course your menu screen will be blank. Right click in the blank area and select add group…

12. Call it Office or whatever.
13. Right click on the Office folder and select Add file…
14. Locate Notepad++Portable.exe under c:\winFE\mount\tools\Notepad++Portable or where ever you installed it on the mounted winFE image and select open.

15. Change the application path to x:\<where ever its installed in the winFE directory structure> –> OK
The icon shouldn’t appear because x:\ doesnt exist yet until winFE is run. Sometime a folder icon doesn’t appear also and that can be downloaded as well and added later. It's possible that without the x:\ could work also but haven't tried.

16. This step can be repeated to add additional programs. If the purpose for winFE is to take forensic images it would be good to install FTK Imager Lite to the winFE tools area. Remember to copy c:\windows\system32\oledlg.dll to c:\winFE\mount\windows\system32\ (Props to Brett Shavers)
When I added FTK Imager Lite I still had to add the following files.
c:\windows\system32\avifil32.dll
c:\windows\system32\msacm32.dll
c:\windows\system32\msvfw32.dll
Also might want to load Colin's Write Protect Application. This will aid in making hard drives online and writable like your storage device. Takes the place of diskpart. Update 4 Jan 13; dont know that its a full replacement for diskpart. Issue with Win7 installations is that a System Reserve partition is created by default of 100MB and when you tell WProtect to read-only and mount, it just mounts the first partition. This is only relevant if your thinking about using RegRipper to get information from it. Not an issue with FTK Imager because your probably imaging the physical drive anyway.
The other additional program I thought nice to have was an Explorer like program. I chose Explorer++.
17. Lets make PStart automatic when winFE starts.
18. Locate the file c:\winFE\mount\windows\system32\startnet.cmd
19. Edit the file with notepad or like program. Add the following line:
wpeinit
start x:\PStart.exe
20. “start x:\Pstart.exe” will execute the program to run and move on to the next command. Make sure your PStart location is correct under c:\winFE\mount.
21. Many automated other programs maybe run from this locations
22. When finished and if you used a thumb drive to organize your tools. Copy the root contents over to the root of c:\winFE\mount\. Copy the t0olz contents if used to c:\winFE\mount\t0olz\
23. If you’ve finished adding additional programs lets complete the image. Make sure you exit out of any programs that are accessing c:\winFE. This includes shutting Pstart off. It might be in your icon tray still active. If you make a mistake go back up to 1 to fix under special note.
dism /unmount-wim /mountdir:c:\winFE\mount /commit
24. Copy the boot image over.
copy c:\winfe\winpe.wim c:\winfe\iso\sources\boot.wim /Y
25. I had an issue where oscdimg.exe could not be located. In case you come across this also its found under \program files\windows aik\tools\x86
cd "c:\Program Files\Windows AIK\Tools\x86"
oscdimg -n -bc:\winFE\etfsboot.com c:\winFE\ISO c:\winFE\winFE.iso
Received an error because the image exceeds the allowable space for a CD but not DVD. Change the command to:
***NOTE XX increment your .iso files created.***
oscdimg -m -n -bc:\winFE\etfsboot.com c:\winFE\ISO c:\winFE\winFEXX.iso
26. Boot using VMware etc or burn to DVD for testing.
This is a continuation from Editing Existing WinFE.
***ENSURE BIOS BOOTS FROM CD/DVD***
1. Attached a storage device to a target system that will be used to store your forensic image.
2. I attached a 64GB thumb drive to take a 60GB operating system hard drive. Just going to simulate.
3. Set the bios to boot from cd/dvd.
4. Started winFE. Since we told Pstart to load automatically it should have opened up. Your background will be different.

6. Open WProtect.exe

7. What you will notice is that the operating system hard drive appears as mounted and not read-only. From all I can tell this isn't the issue because we have taken Troy's registry hacks to prevent this. To make sure we should set it properly. Highlight the OS drive and select dismount. Now select read-only.

8. Dont worry FTK Imager will still be able to see it.
9. Hopefully your storage device is already formatted. We need to make it writable. Select your storage device --> Read/Write --> Mount

10. Open Explorer++ and make sure you can see the storage device. Take note of the drive letter.

11. Now open FTK Imager. Add the OS drive.

12. Add the drive letter for the destination. Add an image file name.

13. Start the imaging

14. After FTK Imager verifies the image you can power off the system.
Updated 4 Jan 2012
Updated Nov 2014
Creating a forensic bootable environment to run tools on a target system using WinPE.
1. Download Windows AIK iso. This file will aid in providing necessary files to create the winFE.
2. Mount Windows AIK file KB3AIK_EN.iso.
a. Use a .iso mounter like Virtual Clone drive. After installing right-click on the icon.
b. Mount the downloaded KB3AIK_EN.iso file.

4. Install Windows AIK Setup.

5. Default installation path.
6. Open Administrator command prompt. Right click command prompt and run as administrator.

7. Change directory in the PRTools area.
cd "c:\Program Files\Windows AIK\Tools\PETools"
8. Copy the necessary files to your winFE creation area.
copype x86 c:\winFE

9. Mount the bootable area.
Dism /Mount-Wim /WimFile:c:\winFE\winpe.wim /index:1 /MountDir:c:\winFE\mount

10. Should see the mount area is populated.
11. Time to mod the registry so that the disc will not automount onboard drives. Open regedit. Start –> regedit.exe –> <enter>.

12. Highlight HKLM
13. Select File –> Load Hive …
14. Locate c:\winFE\mount\Windows\System32\config\system –> Open

15. Name it “winFE”

16. Under HKLM should be winFE
17. Locate the following key HKLM\winFE\ControlSet001\Services\mountmgr –> Right click right panel and select New –> DWORD.

18. Name it NoAutoMount = 1

19. Modify HKLM\winFE\ControlSet001\Services\partmgr\parameters\sanpolicy = 3
***Some other people have also been using # 4 ***

***Additional item to change as OPTIONS ***
HKLM\winFE\ControlSet001\Control\FileSystem /v DisableDeleteNotification /t REG_DWORD /d 1 /f
20. Highlight winFE

21. Select File –> Unload Hive… Confirm Close
22. Modify the wallpaper if you like. Name the BMP winpe.bmp and overwrite existing under c:\winFE\mount\Windows\System32
23. Add directory tools under c:\winFE\mount\

24. Drop tools like RegRipper, Cygwin, FTK Imager Lite, NetCat, Winrar unplugged, IrfanView, etc in this location.
Update 31 Dec 2012; I had to change from long file name to short for some reason even though I had the correct path. You might be able to use long file names with quotes starting at the "c:\...winpe-wmi.cab". Short is what worked for me and I can only guess that it was something to do with the dism.exe program.
25. Add VBS scripting capability:
dism.exe /image:c:\winFE\mount /add-package /packagepath:C:\Progra~1\WI4A4E~1\Tools\PETools\x86\WinPE_FPs\winpe-wmi.cab

26. (Hint use the arrow up key in the keyboard and change wmi to hta) Add HTA:
dism.exe /image:c:\winFE\mount /add-package /packagepath:C:\Progra~1\WI4A4E~1\Tools\PETools\x86\WinPE_FPs\winpe-hta.cab

27. Add scripting:
dism.exe /image:c:\winFE\mount /add-package /packagepath:C:\Progra~1\WI4A4E~1\Tools\PETools\x86\WinPE_FPs\winpe-scripting.cab

28. Add .vbs scripts (props: http://praetorianprefect.com/archives/2010/04/winpe-3-0-forensics/) under tools.
***Additional item to modify would be to set the scratch space ***
Dism.exe /image:c:\winfe\mount /Set-ScratchSpace:512
This would mean the system your booting requires at least 1GB RAM. You could modify to 256 and so on but 512 is the max. Most new systems these days have over 1GB RAM.
29. Add driver packs that way what ever system you come across should boot and see the onboard drives without issue. I have had issues in the past with Linux bootCDs that would not recognize hardware raids specifically SAS Dell blade servers. This winFE was able to see the hardware raid and image them without issue using the existing hardware. I extracted them to my c:\ drive root.
dism.exe /image:c:\winFE\mount /add-driver /driver:c:\DP_MassStorage_wnt6-x86_1110 /recurse

30. I ran the following driver packs. The only reason you would need the LAN or WLAN is if you planned on using NetCat to maybe transfer and image file over the network. CardReader for high capacity drives to store images maybe. Chipset and MassStorage are the two most important. Download the latest and greatest.
a. DP_CardReaders_wnt6-x86_1104131. Closing the image. ***Make sure you close all related windows linked to c:\winFE*** If you dont the image will not close properly.
b. DP_Chipset_wnt6-x86_11051
c. DP_LAN_wnt6-x86_1109
d. DP_MassStorage_wnt6-x86_1110
e. DP_WLAN_wnt6-x86_1104
32. Make sure your not in the command prompt c:\winFE area when you issue the command.
cd c:\
dism /unmount-wim /mountdir:c:\winFE\mount /commit
33. Should get a successful completion.
34. Copy file
copy c:\winfe\winpe.wim c:\winfe\iso\sources\boot.wim /Y
35. Remove bootfix.bin so that you are not prompted to hit any key to boot from disc. This would be bad if we forgot and booted the operating system.
del /f /q c:\winFE\ISO\boot\bootfix.bin
36. Create ISO
cd "c:\Program Files\Windows AIK\Tools\x86"
oscdimg -n -bc:\winFE\etfsboot.com c:\winFE\ISO c:\winFE\winFE.iso
37. Should have your .iso file.
38. Dont forget to test it out…through vmware or live test system before using it within production.
39. To add additional tools, drivers, scripts etc start at step 9 and follow until creating the .iso.
Editing Existing WinFE
Continuation from the Creating WinFE Boot Disc
***WHILE TESTING ENSURE BIOS IS SET TO BOOT CD/DVD***
***ON REAL TARGETED SYSTEMS IT IS A GOOD PRACTICE TO DISCONNECT THE HARD DRIVE BEFORE CHANGING THE BIOS***
1. Edit the existing image.
Dism /Mount-Wim /WimFile:c:\winFE\winpe.wim /index:1 /MountDir:c:\winFE\mount
***SPECIAL NOTE***
If you ever get this message because you failed to properly exit out of a mounted area of c:\winFE utilize the following command:

dism /cleanup-wim
2. Should be able to see the mounted image under c:\winFE\mount
3. I would recommend creating a text document that runs through the diskpart commands if you plan on using diskpart to enable your storage device read/write capability.
4. Lets get the menu system up and running. Download PStart.
5. ***Optional*** I had a spare 4GB USB drive lying around and decided to use that and install PStart to. Reasoning was my attempt at keeping things in order. No other purpose other than that.
6. The winFE disc when booted will be “X:\” so we will have to make sure when we install the programs we give it the right drive letter to run from.
7. ***Optional*** I installed PStart to my 4GB USB drive. If you have an SD drive that is fine too or use your OS c:\. Additionally if you don’t have any issues with permissions you could just install right to c:\winFE\mount\ -or- c:\winFE\mount\t0olz
8.***Optional*** I decided to change the drive letter of my 4GB USB drive to “x:\” just like the winFE disk. This can be done under computer management.

9. Lets download Notepad++ portable and install to get it working in our winFE and PStart.
10. Install notepad++ and copy the contents to the winFE tools area

11. Start PStart by executing the .exe file. The window will appear but of course your menu screen will be blank. Right click in the blank area and select add group…

12. Call it Office or whatever.
13. Right click on the Office folder and select Add file…
14. Locate Notepad++Portable.exe under c:\winFE\mount\tools\Notepad++Portable or where ever you installed it on the mounted winFE image and select open.

15. Change the application path to x:\<where ever its installed in the winFE directory structure> –> OK
The icon shouldn’t appear because x:\ doesnt exist yet until winFE is run. Sometime a folder icon doesn’t appear also and that can be downloaded as well and added later. It's possible that without the x:\ could work also but haven't tried.

16. This step can be repeated to add additional programs. If the purpose for winFE is to take forensic images it would be good to install FTK Imager Lite to the winFE tools area. Remember to copy c:\windows\system32\oledlg.dll to c:\winFE\mount\windows\system32\ (Props to Brett Shavers)
When I added FTK Imager Lite I still had to add the following files.
c:\windows\system32\avifil32.dll
c:\windows\system32\msacm32.dll
c:\windows\system32\msvfw32.dll
Also might want to load Colin's Write Protect Application. This will aid in making hard drives online and writable like your storage device. Takes the place of diskpart. Update 4 Jan 13; dont know that its a full replacement for diskpart. Issue with Win7 installations is that a System Reserve partition is created by default of 100MB and when you tell WProtect to read-only and mount, it just mounts the first partition. This is only relevant if your thinking about using RegRipper to get information from it. Not an issue with FTK Imager because your probably imaging the physical drive anyway.
The other additional program I thought nice to have was an Explorer like program. I chose Explorer++.
17. Lets make PStart automatic when winFE starts.
18. Locate the file c:\winFE\mount\windows\system32\startnet.cmd
19. Edit the file with notepad or like program. Add the following line:
wpeinit
start x:\PStart.exe
20. “start x:\Pstart.exe” will execute the program to run and move on to the next command. Make sure your PStart location is correct under c:\winFE\mount.
21. Many automated other programs maybe run from this locations
22. When finished and if you used a thumb drive to organize your tools. Copy the root contents over to the root of c:\winFE\mount\. Copy the t0olz contents if used to c:\winFE\mount\t0olz\
23. If you’ve finished adding additional programs lets complete the image. Make sure you exit out of any programs that are accessing c:\winFE. This includes shutting Pstart off. It might be in your icon tray still active. If you make a mistake go back up to 1 to fix under special note.
dism /unmount-wim /mountdir:c:\winFE\mount /commit
24. Copy the boot image over.
copy c:\winfe\winpe.wim c:\winfe\iso\sources\boot.wim /Y
25. I had an issue where oscdimg.exe could not be located. In case you come across this also its found under \program files\windows aik\tools\x86
cd "c:\Program Files\Windows AIK\Tools\x86"
oscdimg -n -bc:\winFE\etfsboot.com c:\winFE\ISO c:\winFE\winFE.iso
Received an error because the image exceeds the allowable space for a CD but not DVD. Change the command to:
***NOTE XX increment your .iso files created.***
oscdimg -m -n -bc:\winFE\etfsboot.com c:\winFE\ISO c:\winFE\winFEXX.iso
26. Boot using VMware etc or burn to DVD for testing.
Working with WinFE
This is a continuation from Editing Existing WinFE.
***ENSURE BIOS BOOTS FROM CD/DVD***
1. Attached a storage device to a target system that will be used to store your forensic image.
2. I attached a 64GB thumb drive to take a 60GB operating system hard drive. Just going to simulate.
3. Set the bios to boot from cd/dvd.
4. Started winFE. Since we told Pstart to load automatically it should have opened up. Your background will be different.

6. Open WProtect.exe

7. What you will notice is that the operating system hard drive appears as mounted and not read-only. From all I can tell this isn't the issue because we have taken Troy's registry hacks to prevent this. To make sure we should set it properly. Highlight the OS drive and select dismount. Now select read-only.

8. Dont worry FTK Imager will still be able to see it.
9. Hopefully your storage device is already formatted. We need to make it writable. Select your storage device --> Read/Write --> Mount

10. Open Explorer++ and make sure you can see the storage device. Take note of the drive letter.

11. Now open FTK Imager. Add the OS drive.

12. Add the drive letter for the destination. Add an image file name.

13. Start the imaging

14. After FTK Imager verifies the image you can power off the system.
Subscribe to:
Comments (Atom)