Decided to try installing via the:
http://software.opensuse.org/download/package?project=isv:ownCloud:community&package=owncloud

The version installed was 6.0.4.1 at the time.
This gives the ability if there are updates that they will be installed automatically through apt-get updates and no more manual updates.
I crossed out the items that were not necessary with the update install version verses the manual install.
So...
1. Installed Ubuntu Server 14.04 on the computer.
2. Installed with OpenSSH and LAMP. Root should be the default admin account created for mysql. Remember the password.
3. Performed updates:
sudo apt-get update
4. Performed upgrades:
sudo apt-get upgrade
5. Perform additional required installs (In Accordance With [IAW] Owncloud v6 Manual Installation):
sudo apt-get install php5-gd php5-json php5-mysql php5-curl php5-intl php5-mcrypt php5-imagick
sudo sh -c "echo 'deb http://download.opensuse.org/repositories/isv:/ownCloud:/community/xUbuntu_14.04/ /' >> /etc/apt/sources.list.d/owncloud.list"
sudo apt-get update
wget http://download.opensuse.org/repositories/isv:ownCloud:community/xUbuntu_14.04/Release.key
sudo apt-key add - < Release.key
sudo apt-get install owncloud
sudo chown -R www-data:www-data /var/www/html/owncloud
10. Enabled ssl within Apache2"
sudo a2enmod ssl
sudo a2ensite default-ssl
sudo service apache2 restart
11. Modified the default-ssl file for Apache2:
sudo nano /etc/apache2/sites-available/default-ssl.conf
Add ServerName;

Add owncloud;
<Directory /var/www/html/owncloud>
    Options Indexes FollowSymLinks MultiViews
    AllowOverride All
    Require all granted
</Directory>

12. Enable mod_rewrite
sudo a2enmod rewrite
sudo service apache2 restart
13. Might get error "Could not reliably determine the server's fully qualified domain name"
Add FQDN to /etc/hosts
sudo nano /etc/hosts

sudo service apache2 restart
14. Log into your owncloud via http
-You will get a warning that your data directory is exposed. We'll change that later.
-Create an admin account name with password.
-Leave the data folder alone.
-Hopefully you remembered the mysql root password.
-Call you database "owncloud_db".
-The database will be located on the "localhost".

15. Close the client download window.
-Select admin (upper right corner) --> users

16. Create your first user.
-Provide that user with enough storage space.
-Select admin again and logout.

sudo mv /var/www/html/owncloud/data /
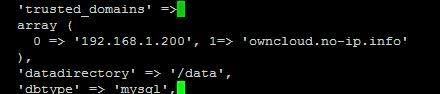
18.
You will need to edit the config.php file and add the fqdn:
sudo nano /var/www/
Add your FQDN; 1=> 'owncloud.no-ip.info'
19. You should be able to access https now without complaint. Running owncloud through http is not healthy. It should be running under https. If you check the ssl cert (view certificates) the default cert used should be from the ubuntu installation and have the computer name in the "issued to" "issued by".

20. OPTIONAL if you dont like the default sizes to upload make these changes:
sudo nano /etc/php5/apache2/php.ini
Change;
post_max_size = 4G
cgi.fix_pathinfo = 0
upload_max_filesize = 4G
date.timezone = "America/New_York"
21. You should be good to go.
UPDATE; 16 Jun 14
1. If you get the following error:
isWebDAVWorking: NO - Reason: [CURL] Error while making request:
SSL: certificate subject name 'XXXXX' does not match target host name
'YYYYY'sudo nano /var/www/html/owncloud/3rdparty/Sabre/DAV/client.php
Find; <ctrl w>curlsettingsAdd below;CURLOPT_SSL_VERIFYPEER => 0,
CURLOPT_SSL_VERIFYHOST => 0, 
sudo service apache2 restart
2. I also added my own self created certs instead of using the default.
Now to get https ssl working with OwnCloud I created self-signed certs. Remember the self signed password as it will ask you again.
sudo openssl genrsa -des3 -out /etc/ssl/server.key 4096
sudo openssl req -new -key /etc/ssl/server.key -out /etc/ssl/server.csr
sudo openssl x509 -req -days 3650 -in /etc/ssl/server.csr -signkey /etc/ssl/server.key -out /etc/ssl/server.crt
sudo openssl rsa -in /etc/ssl/server.key -out /etc/ssl/server.key.insecure
sudo mv /etc/ssl/server.key /etc/ssl/server.key.secure
sudo mv /etc/ssl/server.key.insecure /etc/ssl/server.key
sudo mkdir /etc/apache2/ssl
sudo cp /etc/ssl/server.key /etc/apache2/ssl
sudo cp /etc/ssl/server.crt /etc/apache2/ssl
sudo ln -s /etc/apache2/sites-available/default-ssl.conf /etc/apache2/sites-enabled/000-default-ssl.conf
sudo nano /etc/apache2/sites-available/default-ssl.conf
# SSL Engine Switch:
# Enable/Disable SSL for this virtual host.
SSLEngine on
# A self-signed (snakeoil) certificate can be created by installing
# the ssl-cert package. See
# /usr/share/doc/apache2.2-common/README.Debian.gz for more info.
# If both key and certificate are stored in the same file, only the
# SSLCertificateFile directive is needed.
SSLCertificateFile /etc/apache2/ssl/server.crt
SSLCertificateKeyFile /etc/apache2/ssl/server.key
# SSLCertificateFile /etc/ssl/certs/ssl-cert-snakeoil.pem
# SSLCertificateKeyFile /etc/ssl/private/ssl-cert-snakeoil.key
sudo service apache2 restart