Situation:
1. Needed to boot an encrypted hard disk drive (HDD) into VMware and collect volatile information from the running system.
2. Did not have admin privileges to remove bitlocker. (Couldn’t get either, Army regulations and all.)
3. HDD was encrypted with bitlocker.
4. Was able to obtain the bitlocker key though.
Software Required:
VMware Workstation
Liveview
Operating system installation disk
Work Around:
1. HDD was in an evidence file format called disk dump (dd). Flat
file which was an exact copy of the original HDD bitlocker and all.
2. Start liveview.
3. Liveview opened. If your using the non-law enforcement version you
will be missing the ability to blank out the passwords. The operating
system I’m looking at was Vista Enterprise. Pointed liveview at the
image file. Redirected the configuration files out to the drive and
generate the config files. Select Start.
4. Config files should have been generated.
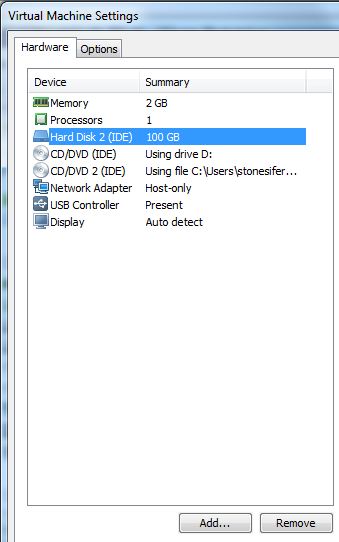
5. Double click on the .vmx file. This should open VMware config editor. Select edit virtual machine settings.
6. Settings windows should appear.
7. If your going to sniff the network traffic might want to add a network device as host only.
8. Install the operating system installation CD or .iso file within the CD/DVD. Add a new CD/DVD and place the
bitlocker_recovery_tools_vistax86.iso within the device. The files contained are used to decrypt the drive.
Additionally add a new virtual HDD that is greater than the size of the operating system HDD.
Ensure the bitlocker HDD is 0:0. New HDD is 0:1. Operating System DVD
is 1:0. Bitlocker tools CD is 1:1 within advance settings.
9. Should look similar to this.
10. Boot into the BIOS. Boot from CD.
11. Boot from DVD. Press any key before the time out.
12. Select next to arrive at the “Repair your computer” and select.
13. Manual input the bitlocker key, select next, select finish and it should prompt that the drive is accessible.
14. The drive with the operating system should appear. Select Next.
15. Select command prompt.
16. type diskpart <enter> –> list volume <enter>. Note the operating system drive letter.
17. type list disk <enter>. Note the extra HDD we added. We need to partition and format that drive.
18. type select disk=1 <enter>
19. type create partition primary <enter>
20. type assign letter=G (or what ever available drive letter is next) <enter>
21. type select partition=1 <enter>
22. type format fs=ntfs label=”decrypted” quick <enter>
23. type list volume <enter> and you should see the new HDD.
24. type exit <enter>
25. Change over to the bitlocker CD tools.
26. type repair-bde.exe d: g: -RecoveryPassword
xxxxxx-xxxxxx-xxxxxx-xxxxxx-xxxxxx-xxxxxx <enter>. It will begin
decrypting the entire contents of the operating system encrypted drive
to our newly created HDD.
repair-bde.exe <input drive> <output drive>
-RecoveryPassword xxxxxx-xxxxxx-xxxxxx-xxxxxx-xxxxxx-xxxxxx
<enter>
27. Forgot…make the new HDD active.
28. Close command prompt and select shutdown.
Edit the configuration .vmx file.
Remove the primary HDD 0:0.
29. Make our new HDD 0:0 in advance settings. Remove bitlocker tools CD.
30. Should appear similar to this.
31. Boot to the operating system DVD again to fix the MBR.
Select Next –> Repair your computer –> Repair and restart.
32. Following message may occur. Reboot to operating system DVD.
33. Select Next. Select Repair your computer. Select Next for the
recognized operating system. Select Startup Repair. Select Finish.
34. The system should boot.
35. Now to get admin privileges. If you have the LE version of
liveview than you should be able to get in no problem because the
passwords are blanked out. If not, utilize
http://www.pogostick.net/~pnh/ntpasswd/ bootable .iso file to blank out the passwords. Additionally you could also use
https://www.pinguin.lu/index.php.
Now the disk is unencrypted and you have admin privileges to run your volatile scripts or malware testing.